|
Art This Art Theme Day looks at different styles of art as well as famous artists. If your kids are little artists they will want to do this Theme Day, but even if they aren’t you may be surprised at how you can inspire your kids to try a different art form just by showing them the works of different artists. Sometimes kids become discouraged during art projects because they want their art to be “perfect,” however, showing kids that artists have continually challenged the notion of what art is throughout history and by highlighting the different styles may encourage them and provide them with the freedom of just letting go of perfection and making something about how they feel or view things instead of making something that is completely realistic. I know it may seem redundant to have a Theme Day about art since every Family Theme Day features art projects, but this one was a lot of fun for us because it looked at different styles and we hope it will give your family a lot of inspiration as well. Print out the Family Theme Day Planner and decide which activities you’d like to do and in what order. NOTE: There are many ideas here and there is no way you can do them all in a single theme Day. We first started working on our projects over spring break and then continued to focus on different styles throughout the year. You may choose to do all the projects or just some of them depending on what your children are interested in. I highly suggest taking out books from the library that show different styles of famous artists works as this is a good starting point. INTRODUCTORY DISCUSSION: Talk to your kids about what their definition of “art” is. Tell your children that artists have always tested the boundaries of art and are still creating different mediums. People don’t agree about art either. Some like realistic paintings, others like paintings that evoke feelings but don’t look like an actual scene; some people like sculpture and mobiles, while others may prefer drawings or chalk; some people like to use bold bright colours and others prefer darker shades or even focus on one spectrum of colour for their works. When you are finished exploring different styles of art through this Theme Day, have this same discussion about art and see if they’ve changed their minds. Art is many things, but it always evokes conversation!
SONGS: I couldn’t think of specific songs about art for this Theme Day. If you have a suggestion please let us know at info@familythemedays.ca.
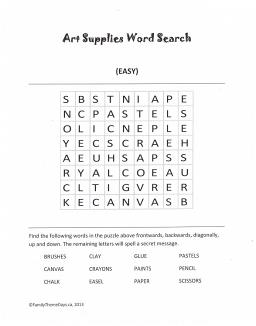
SCRAPBOOK ACTIVITIES: COLORING PAGES: You can find many free colouring pages online by using your favourite search engine and typing in “Art or Artist Coloring Pages” or print out my Art Supplies Coloring Page.
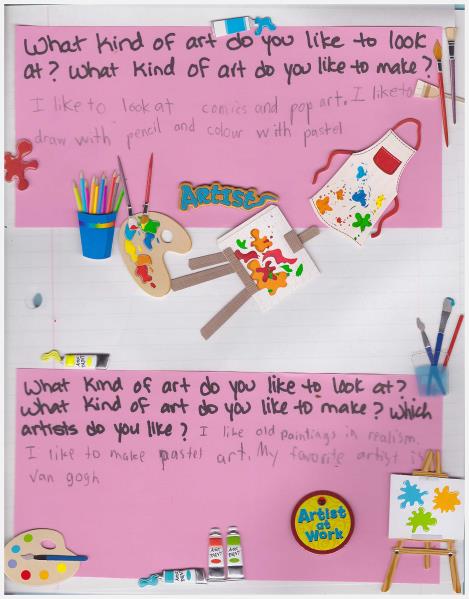
JOURNALING QUESTION PROMPT: NOTE: You can do this journal before or after you’ve explored various art forms. It also might be neat to journal twice (before and after) and see if your child’s opinion changes! I had my kids journal after all the art projects. Write out one or more of the following questions in your Family Theme Day Scrapbook or on a piece of paper to glue in your scrapbook: What type of art do you like to make the best? What type of art do you like to look at? Can you name any famous artists? Have you seen any famous paintings/ what did you see? What form of art would you like to learn more about or try yourself? Which artists do you like? Choose the level of your child:
¨ Toddler – discuss the answer(s) out loud first and have your child draw a picture of the answer ¨ Preschooler/Kindergartener – discuss the answer(s) out loud first and write the answer down for him/her leaving one word for him/her to write out himself/herself with your help. You could also encourage him/her to draw a picture as well. ¨ Early Grade School – have your child either write out the answer himself/herself (encourage phonetic spelling) without your help, or offer to help with spelling each word out loud one word at a time. ¨ Grade School – have your child write a sentence or two on his/her own and then read over and discuss the response. (You decide whether to correct the spelling or not) ¨ Older Child – have your child write a longer response (paragraph). ¨ As A Challenge – instead of a question ask your older child to write a story or poem about art or artists.
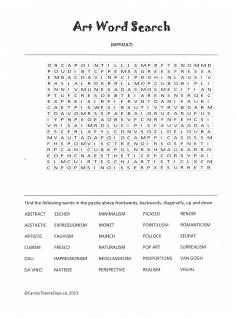
PUZZLES: Print out an Art Word Search: Difficult Art and Artists Word Search Check here for the answer keys: Easy Art Supplies Word Search Key or Moderate Art Word Search Key or Difficult Art and Artists Word Search Key.
BOOKS: Raid your child’s bookshelves to find any books about art or artists. OR Go to the library with your child to find some books about famous pieces of art. OR Go to the library on your own to find books about art or artists from both fiction and nonfiction to have already on hand for your theme day. Many libraries allow you to go online and search for titles based on subject (search for “art” or “museums” under “children’s books). Reserve them if you can to save time.
Here are two “How To” books for young artists:
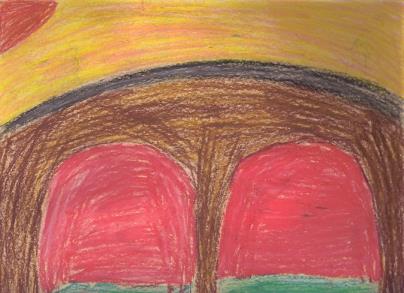
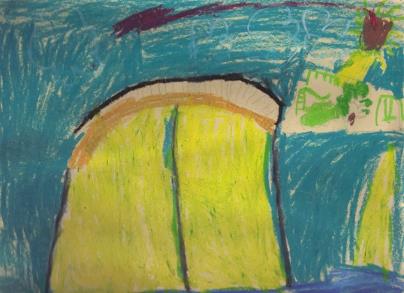
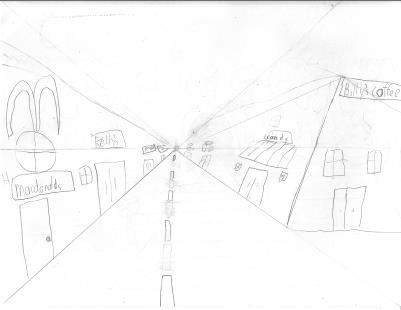
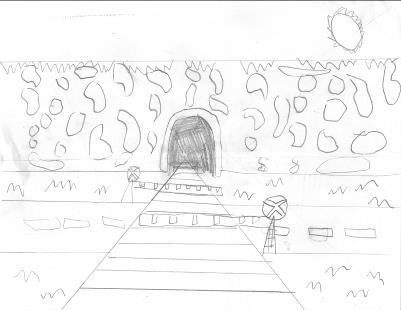
· 1 2 3 I Can Paint, by Irene Luxbacher, Kids Can Press, 2007 – This is a good little book that simply explains what painting is. It offers a list of materials with big photographs and gives some easy activities that highlight mixing colours, light and dark, evoking mood etc.. · The Jumbo Book of Art, written and illustrated by Irene Luxbacher, Kids Can Press, 2003—This is a great book full of many different art activities! Try to find some of these nonfiction/learning titles that showcase famous works of art in a way that would appeal to kids: · A Child’s Book of Art: Discover Great Paintings, by Lucy Micklethwait, Firefly Books, 1999—This is a great book for early grade schoolers and really highlights details in thirteen different paintings. · The Art Book for Children, text by Amanda Renshaw and Gilda Williams Ruggi, Phaidon Press Inc., 2005 – We took out this book and book two from the library and loved them! They highlight different pieces of artwork from different museums but present them to children with questions and ideas to help your kids look at the art differently and to notice things and think about art in different ways. · Looking at Pictures: An Introduction to Art for Young People, by Joy Richardson with illustrations by Charlotte Voake, Harry N. Abrams, Inc., Publishers, 1997—This is a great book really delves into twelve different themes in the study of art in a very approachable way. Some of the themes examined are: telling a story, hidden meanings, tricking the eye, making arrangements... · No One Saw: Ordinary Things Through the Eyes of an Artist, by bob Raczka, Millbrook Press, 2002 – By looking at 16 different pieces of art the author states how each artist was unique in his/her viewing of the subject. I love the message at the end to kids that “Artists express their own point of view and nobody sees the world like you.” · Unlikely Pairs: Fun With Famous Works of Art, by Rob Raczka, Millbrook Press, 2006 – Another book by Bob Raczka I know, but I think his books are the perfect way to get children to look at art in a different way. In this book kids may appreciate the humour of the pairings that match different paintings and by putting them side by side creates a funny story. · The Usborne Introduction to Art, published by Usborne Publishing Ltd., 2003—My eldest really enjoyed pouring over the details in this book which was made in association with the National Gallery in London. Here are some fun picture books about art: · Art’s Supplies, by Chris Tougas, Orca Book Publishers, 2008—See what happens when Art’s art supplies decide to throw a party. · Katie’s Sunday Afternoon, by James Mayhew, Orchard Books, 2004 – I adored this picture book about a little girl who visits the art museum on a hot sunny day and literally dives into the pictures. She joins five famous Pointillist paintings and embarks on quite the adventure! · Morris the Artist, by Lore Segal and pictures by Boris Kulikov, Frances Foster Books,2003—Morris doesn’t want to give Benjamin his gift because he likes it so much but holding it throughout the party proves to be too much for him and once it is open the present is a delightful artist treat for all the children. · Squeaking of Art: The Mice go to the Museum, by Monica Wellington, Dutton Children’s Books, 2000—Ten mice visit the museum in this interactive book that asks the reader questions as they explore the different galleries. This would be a perfect book to read with children before their first visit to an art museum! CRAFTS: NOTE: Each craft was chosen to showcase a particular form or style of art. There are a lot of ideas here and you won’t be able to do them all in one day so pick and choose according to your children’s likes and abilities. We devoted one form of art to one day, really focussing on the concept or lesson of the craft and of course looking at books with art in them. I found it very useful to show my boys examples of each concept before we attempted the craft. You can do this by bookmarking pages in art books from the library or by printing out images from the internet or if you have a tablet you could save images to your photos in advance and use that as an album to show the examples. PERSPECTIVE: NOTE: Perspective in art is basically trying to represent what the eye sees on a flat surface. It is making things appear further away by using size and a vanishing point to create depth. Check here for some examples of vanishing point: http://en.wikipedia.org/wiki/Vanishing_point PROJECT 1: PENCIL DRAWING CITYSCAPE OR ROAD Materials: Drawing paper (white paper), sharpened pencil, eraser, and a ruler, (Optional) pencil crayons. Step 1: Have your child draw a line using the ruler across the page to represent the horizon (explain that this means the line that separates earth from sky). Step 2: Have your child pick a spot on the horizon line to be the vanishing point and lightly draw in a dot to show where that point is. Step 3: Next, have your child lightly draw four lines stretching to the four corners of the paper from the vanishing point. I did this for my littlest guy and by eldest did this himself. Step 4: Let their imaginations soar and have them draw their own road picture using the lines as the road. They can draw trees, buildings, lamp posts, etc. For a look at this project done in colour check out my sons’ forest perspective picture on our Facebook Album: More Crafts and Activities.
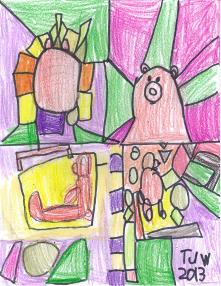
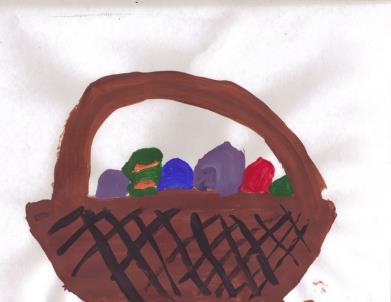
STILL LIFE: NOTE: Still Life is a work of art that shows an arrangement of usually inanimate objects. Check here for some examples: http://en.wikipedia.org/wiki/Still_life Project 2: STILL LIFE PAINTING Materials: White paper, paints and paint brushes, wax paper or a paper plate or a proper art pallet, art smock or old clothes to wear, newspaper or plastic to cover and protect the table, a jar of water, some paper towels, plus whatever objects your child chooses to pose for his/her Still Life painting. Step 1: Have your children gather items for their Still Life and then arrange them on the working table or on a chair or another table near the working/painting area. Step 2: Put blobs of coloured paint on the wax paper or paper plate (or pallet if you have one) and let your child paint the arrangement of objects before him/her.
ETCHING or PRINT MAKING: NOTE: Etching is when a picture is engraved in metal or even wood or lino and then printed onto paper. Here are some examples of etching: http://en.wikipedia.org/wiki/Etching PROJECT 3: STYROFOAM PRINT MAKING Materials: Styrofoam (you can use take out boxes from restaurants or the boxes used to hold mushrooms etc. at the grocery store—cleaned after use), toothpicks, paint, sponge, white paper, wax paper, newspaper or plastic to over your work space, art smock or old clothes to wear, paper towels for clean up. Step 1: Give your child a piece of Styrofoam and have him/her draw a picture by carving it into the Styrofoam using a toothpick or plastic fork. Step 2: Put some paint on a piece of wax paper and lightly press the sponge in the paint. Pat the sponge onto another sheet of paper to release excess paint. If you have a small paint roller you could use this as well. Step 3: Rub the paint dipped sponge over the etching (try not to get paint in the dents of the etchings). A small roller works well with this craft offering more efficiency but we didn’t have one. Step 4: Press the etching onto a piece of white paper and continue to press for a count of at least 5. Then gently lift up to reveal the design or picture.
NOTE: After these three crafts you can go on to explain how artists kept changing and tried different ways to express what they saw or were feeling. These different trends led to the different art movements. NOTE: A great book to show how art has changed and developed over time is Name That Style: All About Isms in Art, by Bob Raczka, Millbrook Press, 2009. He shows an example of Naturalism, Mannerism, Neoclassicism, Romanticism, Realism, Impressionism, Pointillism, Fauvism, Cubism, Futurism, Surrealism, Expressionism, Op art, and Photorealism and then explains each movement pointing out why artists moved that way and what are some characteristics of each style. IMPRESSIONISM: Note: Impressionism is art that uses free visible brush strokes to depict light in a common scene. It started in Paris in the 19th Century and numerous artists from that era formed the movement like Monet, Renoir, and Degas to name just three. Check here for more information and for examples: http://en.wikipedia.org/wiki/Impressionism PROJECT 4: PASTEL MONET INSPIRED BRIDGE NOTE:: I found this beautiful video of Monet’s bridge paintings set to the song “Bridge Over troubled Water” by Simon and Garfunkle which I used to show my kids before we did this craft: http://vimeo.com/23948385 Materials: Pastels (easy to find a kids set at your local craft store), white drawing paper (harder paper works best), paper towels, examples of Monet’s Bridge Paintings (Optional) Step 1: Let your child draw his/her own bridge and the nature around it. Step 2: Encourage multiple colours instead of solid colours (discuss what colours can be seen in water, in the sky, in leaves etc.) and encourage your child to colour the whole page instead of just parts of it.
NOTE: My Eldest liked working with pastels so much he did a similar craft based on Van Gogh’s Starry Night. Check on Facebook Album: More Crafts and Activities to see a photo. I just love it!
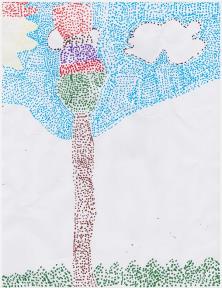
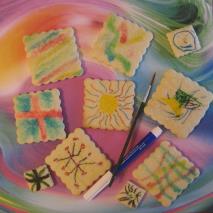
POINTILLISM: NOTE: Pointillism is when small separate dots of pure color are applied in patterns to form an image. It is a form of art that branched from Impressionism and was developed in 1886 by Georges Seurat and Paul Signac. For examples of Pointillism check here: http://en.wikipedia.org/wiki/Georges_Seurat and http://en.wikipedia.org/wiki/Paul_Signac PROJECT 5: MARKER POINTILLISM
Materials: Coloured markers (preferable washable) , white paper, (Optional) a photo or picture for your child to look at while drawing.
Step 1: Either encourage your kids to look at a photo from a family vacation or from a magazine or have them create a scene on his/her own (whatever your child prefers). Some kids will want to create their own vision while others will need a subject to look at. Step 2: Show your child pictures of pointillism and explain that the pictures are made from little dots of colour. Encourage you d kids to use different colours and shapes. Talk about what colours your see in trees and grass and water etc...a mix. Step 3: Let your child create a picture using only dots!
To see a picture of a Pointillism painting made by my Eldest check our Facebook More Crafts and Activities Album.
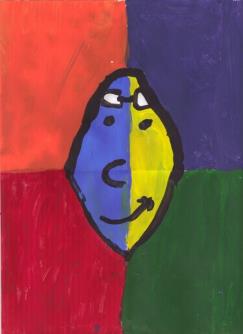
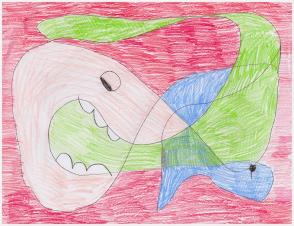
FAUVISM: NOTE: Fauvism is a movement of art that uses strong colour in place of the more realistic colours used in Impressionism. Check here for examples of Fauvism: http://en.wikipedia.org/wiki/Fauvism PROJECT 6: MATISSE INSPIRED PORTRAIT NOTE: Explain to your child that a portrait is a picture the artist makes of another person. Show your child the Portrait of Madame Matisse by Matisse which is an example of Fauvism: http://en.wikipedia.org/wiki/File:Matisse_-_Green_Line.jpeg Materials: Bright paints, paper or canvas (from a craft store), paints, jar of water, wax paper or paper plate or palette, art smock or old clothes, paper towels, newspaper or plastic to cover the workspace, a picture of the person your child wants to do a portrait of.
Step 1: Have your child lightly draw a line down the centre of the page he/she will paint on and then draw one across the page horizontally splitting the picture into 4 sections. Step 2: Have your child lightly draw the portrait of his/her chosen person in the middle of the paper using the middle line to mark the middle of the face. Step 3: Now encourage your child to paint the face using two different colours for the skin and then using four different colours of the background (I know Matisse used 3 colours for the background but I thought four would work as well). Step 4: Let the painting dry and then either display it or giving it as a gift to the person the portrait is of (if the subject is a member of the family or a friend).
NOTE: For a book about Matisse great for kids to learn more about him and see examples of his style try this book in the Artists in Their Time series: Henri Matisse, by Jude Welton, Franklin Watts, 2002.
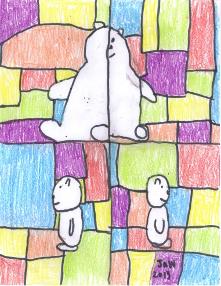
CUBISM:
NOTE: Cubism is when artists depict objects from many different viewpoints instead of just one this is done basically by reassembling an object in abstract form. Cubism was pioneered by Pablo Picasso and Georges Braque in the early 1900’s. For examples of cubism check here http://en.wikipedia.org/wiki/Cubism
NOTE: This Craft duplicates the notion of looking at something from different viewpoints but instead of asking a child to paint in such an abstract way I just had my kids literally view an object from different viewpoints. I originally wanted my kids to cut up the drawings and paste them in an interesting way but they liked their drawings and instead wanted to just add colourful backgrounds to each quarter.
PROJECT 7: TEDDY BEAR CUBISM PICTURE
Materials: Pencil, markers and crayons, white paper, a teddy bear or other object to draw, Optional: a ruler, child safe scissors, glue stick).
Step 1: Split a piece of paper into 4 quarters by folding it. Step 2: Have your child use a pencil to draw teddy bear face from 4 points of view in each quarter. I turned the bear’s back to my boys for the first quarter, then turned it to face them for the next. For the last two quarters I turned the bear to each side. Step 2: Have your child colour the bear and the background as my kids did using marker to highlight the shapes OR draw light squares over the bear and have your child cut it up and then paste the pieces together on a separate sheet of paper.
EXPRESSIONISM:
NOTE: Expressionism is a modernist movement from the beginning of the 20th century, distorting the world for emotional effect or to express an emotion or feeling. Check here for some examples: http://en.wikipedia.org/wiki/Expressionism
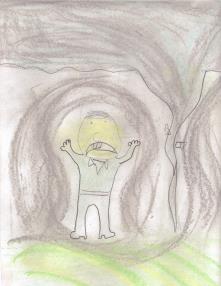
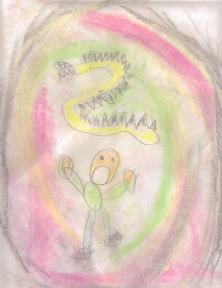
PROJECT 8: MUNCH INSPIRED CHALK DRAWING OF FEAR:
Materials: Paper (coloured craft paper that is slightly textured works well – try not to use smooth paper like computer paper for this craft), various colours of chalk (we used sidewalk chalk instead of buying proper artists chalk), newspaper to lay on the table or workspace, a damp cloth for afterwards to clean fingers and the table.
NOTE: Some kids may be irritated by the chalk dust. If your child had allergies you may want to choose a different medium – pastels could work for this project.
Step 1: Show your child Edvard Munch’s The Scream: http://en.wikipedia.org/wiki/File:The_Scream.jpg Step 2: Talk about what the figure in the picture (actually Munch) might be scared of. He actually said the painting was based on a real experience when he was walking with some friends and the sky was all orange. He literally stopped where he was and was suddenly terrified. Step 3: Now have your child draw a scared face in the middle of the piece of paper to represent his/her own face. Step 4: Ask your child do draw something that scares him/her around the drawing of the scared face. Step 5: Have your child use the chalk to colour the picture. Step 6: Show your child how to make swirls of colour moving towards the figure in the picture. Ask him/her what colours should represent the fear best. Step 7: Show your child how he/she can rub the colours together using fingers. Step 8: Blow additional chalk dust onto the newspaper and then wipe fingers with the cloth. Step 9: Have your child name the picture and then display it.
NOTE: For kids who are interested in learning more about the artist of The Scream try to find this book in the Art Profiles For Kids series: Edvard Munch, by Jim Whiting, Mitchell Lane Publishers, 2009.
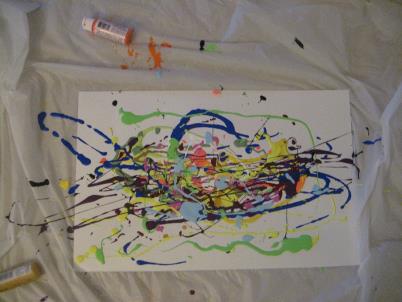
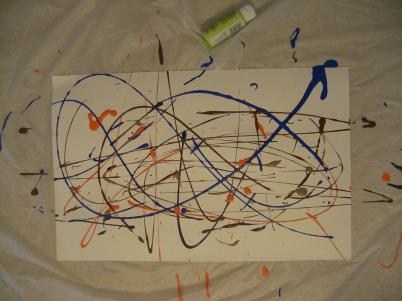
ABSTRACT EXPRESSIONISM: NOTE: Abstract Expressionism was a movement that started prior to World War II and gained more acceptance after World War II which was a time of artistic censorship. If the subject matter were totally abstract it would be seen as apolitical, and therefore safe. (For more of the history check here: http://en.wikipedia.org/wiki/Abstract_expressionism ). Abstract Expressionism gives the impression of spontaneity (ie. Just letting the paint go wherever, just covering the canvas in one colour) however, most of these paintings involved careful planning, especially because of their large sizes. NOTE: Wassily Kandinsky’s art was the first to be described by this term (http://en.wikipedia.org/wiki/Wassily_Kandinsky) but many artists are known for this type of art like: Willem de Kooning http://en.wikipedia.org/wiki/Willem_De_Kooning), Mark Rothko (http://en.wikipedia.org/wiki/Mark_Rothko) and Jackson Pollock (http://en.wikipedia.org/wiki/Jackson_Pollock ). NOTE: Abstract Expressionism is a great art form to show kids who think they “are not artistic” as the spontaneity and simplicity are easily replicated by children. The following craft is inspired by Jackson Pollock: One of the folks at Artsy.net helped me come across this Jackson Pollock Page to share with all of you: https://www.artsy.net/artist/jackson-pollock
PROJECT 9: JACKSON POLLOCK INSPIRED DRIZZLED PAINT
Materials: acrylic paint, large sheet of construction paper, various bottles of washable paint (preferable squeeze bottles), plastic disposable table cloth (it is well worth buying one of these from a dollar store for this project as it could get messy. Even better set this table cloth up outside and do the craft outside!), old clothes or art smock, (Optional: paintbrushes, a straw).
Step 1: Set up your work area with a large plastic disposable table cloth and set the large sheet of construction paper on the table cloth. NOTE: You could do this on smaller paper but to get a better idea of what Pollock did use larger paper...his canvases were HUGE! Step 2: Let your child choose the colours that most inspire him/her and then tell your child to stand over the paper and to squeeze paint onto the paper. You could also pour it in slow drizzles, or dip a straw into small bottles and then let that drizzle and drip onto the paper. Your child could even dip a paint brush in and then flick the tip of the brush close to the paper to have it splash the paper. Step 3: Have your child do this with lots of different colours. Step 4: Let the paint dry and then display!
NOTE: To see a photo of this art being made check out our Facebook More Crafts and Activities Album.
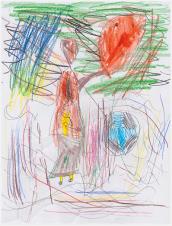
SURREALISM: NOTE: Surrealism began in the 1920s and features the element of surprise. It is art that sets imaginations free since the word “surrealism” comes from the French word meaning “super realism” and so it is art that is more spontaneous as opposed to being well thought out. Surrealism is a combination of the real and unreal and describes an image in which the unusual is show as a part of everyday life. Often surrealist works seem like weird dreams. Check here for examples: http://en.wikipedia.org/wiki/Surrealism NOTE: For a good book about Surrealism for kids try this one in the Eye on Art series: Surrealism, by Hal Marcovitz, Lucent Books, 2008. PROJECT 10: ANDRE MASSON INSPIRED AUTOMATIC TYPE DRAWING NOTE: This craft isn’t proper automatic drawing but a representation of what it is. Check here for an example Andre Masson’s Automatic drawing: http://en.wikipedia.org/wiki/Andr%C3%A9_Masson Materials: White paper, black pen, pencil crayons. Step 1: Have your child use a black pen (so no erasing) to scribble on the paper. Step 2: Now have your child turn the scribbles into something else. Help your child by asking these questions: What do the scribbles look like? What do you see in them? Can you change any to people? Do any scribbles remind you of animals? What colours can you use to change the picture? Step 3: Don’t forget to title and then display the art.
NOTE: You can make a game of this project by having everyone in the family scribble and then pass their paper to the person on the right. Then you have to make a picture out of the scribbles passed to you.
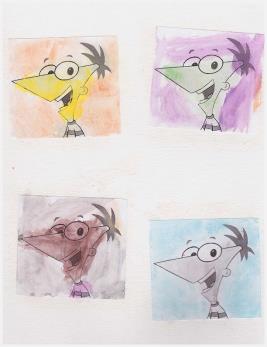
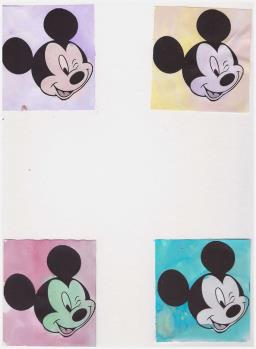
POP ART: NOTE: Pop Art emerged in the mid 1950’s as a challenge to fine art by using images from popular culture. For more information and some examples check here: http://en.wikipedia.org/wiki/Pop_Art PROJECT 11: CELEBRITY OR CHARACTER PORTRAIT IN THE STYLE OF ANDY WARHOL NOTE: Search online for any of the famous Marylin Monroe Paintings by Andy Warhol and explain that she was a famous film actress of the day. For one example check here: http://www.webexhibits.org/colorart/marilyns.html NOTE: For a great book about Andy Warhol for kids try this one: Andy Warhol, Written and illustrated by Mike Venezia, Children's Press, 1996. Materials: Four photocopied pictures (we used cut and paste clip art) of a cartoon character your child wants to work with (just as Andy Warhol used Mariylin Monroe), water colour paints, watercolour paper (or harder paper like construction paper), water, glue stick. Step 1: Have your child arrange the black and white photocopied pictures of the cartoon character on the watercolour paper just as Warhol has done in his Marylin Monroe pictures. Have your child glue them to the sheet of paper. Step 2: Now have your child paint each square a different colour and also paint the cartoon character a different colour. Remind your child to choose colours unlike the real character. Step 3: Let the picture dry and then display.
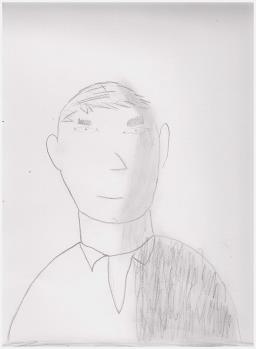
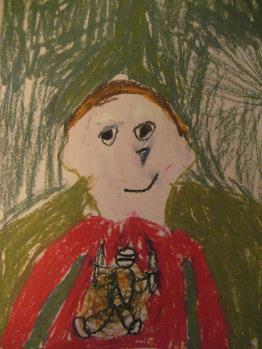
SELF PORTRAIT: NOTE: I used this as a final project after we tried the above mediums so that my sons could pick their favourite style as inspiration for their self-portrait.
NOTE: For a great look at famous Self-Portraits try to find this book: Here’s Looking at Me: How Artists See Themselves, by Bob Raczka, Millbrook Press, 2006. This book has 14 different Self-Portraits by famous artist like Van Gogh, Norman Rockwell , and M.C. Escher. Each one is unique and Raczka offers explanations on each one and points out interesting facts.
NOTE: You can also go online to view famous self-portraits. Here is one site I found with quite a few: http://www.artquotes.net/famous-paintings/self-portraits/index.htm
PROJECT 12: SELF PORTRAIT IN CHOSEN STYLE
Materials: Let your child choose the medium (Paint, Chalk, Pastel, Pencil, Crayons, Markers...) and gather your materials based on that choice. If you’ve done all the above art projects this will give your child an opportunity to explore the same medium once more. It will be interesting to see what style your child likes. If you have more than one child doing this try to get them to choose their medium by whispering in your ear so each child can be unique. My youngest loves to copy his big brother so I had him whisper his choice in my ear first and then had my Eldest choose.
Further Materials: Your child may want a handheld mirror or a photograph of himself/herself as well.
Step 1: Let your child create his own vision of himself using the medium of choice. Your child can use either a photograph of himself/herself or a mirror or just draw by memory (or what your child thinks he/she looks like). Step 2: Don’t forget to display this work of art once completed and dry (if required).
NOTE: Art is more than 2-Dimensional pictures though and perhaps your child will gravitate more to something that is concrete. Try these two art projects to showcase two other mediums Sculpture and Mobile.
SCULPTURE: NOTE: Sculpture takes many forms but is basically three dimensional art. Often sculptures are carved or modeled out of wood, marble, clay etc., but modern sculptures can be made out of anything including recycled materials. Check here for some examples: http://en.wikipedia.org/wiki/Sculpture
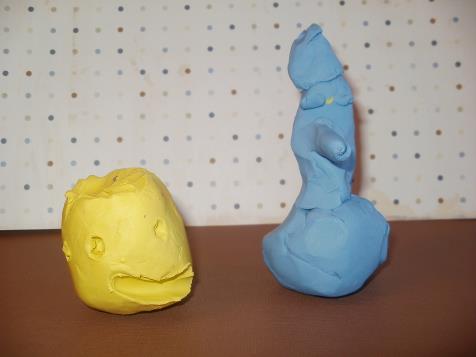
PROJECT 13: CLAY OR PLAY DOUGH BUSTS
NOTE: A bust is a sculpted representation of a person’s head and shoulders. For some examples check here: http://en.wikipedia.org/wiki/Bust_%28sculpture%29
NOTE: The carving will be minimal in this art project but you can remind your kids that some artists used marble or wood to carve. Talk about the difference between using materials like that compared to clay.
NOTE: Initially, we made our own molding clay (some that hardened on its own) for this project. We had to redo this project later as I couldn’t find the photographs of the busts nor could I find where I put the actual sculptures. I ended up liking the store-bought clay better though as the kids could choose their own colours, it was easier to “carve” and mold into shape, and was easier to photograph. Our initial ones were bright white and it was hard to see the details. For those reasons I changed the project to our second attempt.
Materials: Store-bough modelling clay, Plasticine or play dough, paper clips for carving tools.
Step 1: After showing your child what a bust is have him/her pick a colour of clay and then roll it into a ball. Step 2: Now have your child carve (using paper clips) and pinch and mold the clay into the shape of a person’s head to create mini busts. Step 3: Display the finished art.
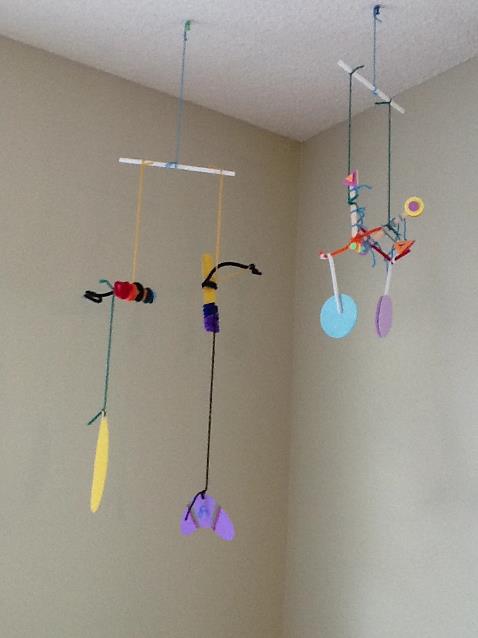
MOBILE: NOTE: A mobile is a kinetic sculpture, which means it is meant to move and change, that hangs. For examples check here: http://en.wikipedia.org/wiki/Calder_mobile PROJECT 14: CALDER INSPIRED MOBILE Materials: Yarn or string, straws (recycled chop sticks would work too), paper, hold punch, craft sticks, pipe cleaners, foam stickers...or anything else….use your imagination. Step 1: Tie a piece of yarn or string to the middle of the straw to eventually pin the mobile to the roof. I tied a little loop at the end to fit the pins Step 2: Tie two other pieces of yarn to either end of the straw to start the craft. More may be needed. Step 3: The basic structure o this craft is to have the two sides of the straw balanced by different shapes hanging from either end. My kids had fun attaching different things to create theirs. They used construction paper cut into shapes, foam stickers, pipe cleaners and craft sticks to do so. Basically they kept adding pieces and then lifting it do see if it balanced. NOTE: For more about Calder try to find this picture book: Sandy’s Circus: A Story about Alexander Calder, by Tanya Lee Stone and Boris Kulikov, Viking, 2008. OTHER: There are so many different art projects you and your children can undertake. Many craft books and websites offer additional ideas to explore famous works of art. I have only picked some that highlight certain mediums or styles. Hopefully this Theme Day will have inspired your kids to try new mediums or explore art.
FOOD:
SNACK: Yogurt Drawings:
Ingredients: Plain or vanilla yogurt, ice cream sauces like strawberry and chocolate in squeezable tubes or small tubes of squeezable icing.
Step 1: Give your little artist a bowl of yogurt and the tubes of sauces or icing and let him/her decorate away! Step 2: Enjoy!
LUNCH:
Art Platter Salad or Fruit Tray: My kids basically raided the pantry and fridge for this one using crackers, fruits, vegetables, shredded cheese etc. to create a masterpiece on a platter.
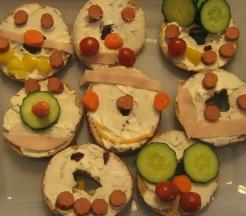
Bagel Art: Give your child an assortment of toppings like cheese, pepperoni, pickles, sliced or shredded carrot, cherry tomatoes etc., and have him/her decorate the bagels.
DESSERT:
Cupcake or Cake Art: The ultimate edible art for those with a sweet tooth would of course be cakes or cupcakes. Next time you bake something sweet to eat give your child some icing and candies or fruits and let him/her decorate away!
Painted Cookies: Make some sugar cookies or use store bought ones or even graham crackers and then create some edible paint by mixing 1 tbsp. of apple juice with a few drops of food colouring. I have special brushes for cakes that I use when I decorate occasionally—you don’t need special ones, just make sure you use clean brushes that are set aside only for food use and not for real paint. We also used some edible markers that I found on sale at our local craft store. Those were a lot of fun to use.
LEARNING ACTIVITIES:
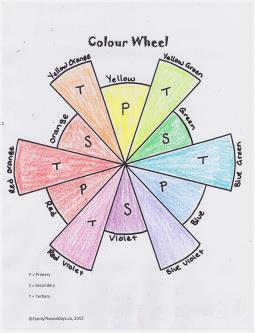
If you have done all the art activities we listed for this Theme Day you have been doing a lot of learning activities at the same time since each project highlighted a specific form of art, but if your little artist is an analytical type or simply wants to learn more you could use this Theme Day/Week/Month to learn about the primary and secondary colours:
COLOR WHEEL:
Print out my Colour Wheel printable and together sort through crayons and pencil crayons to find the correct colours for each part of the chart. Label the Primary, Secondary and Tertiary Colours on the chart as well.
MIXING COLOURS:
After completing the Colour Wheel take out those paints again and try to create the secondary and tertiary colours by mixing the three primary colours.
WEBSITE:
For a website that offers a glimpse at some famous paintings and then offers information about those paintings try this site: http://gardenofpraise.com/art.htm
EXTENDED ACTIVITIES:
AUDIO VISUAL: Search through your child’s DVD/ video collection (or visit your local library before hand or the Video Store) to find your child’s favourite shows with about art or artists. Many libraries carry DVDs of artists biographies.
OUTDOOR ACTIVITIES:
Some Farmer’s Markets or Street Fairs offer artists work for sale. You could have a nice family outing by wandering through such a set up and admiring the art.
If you live near a Sculpture Garden take a family stroll through it to view the sculptures.
FIELD TRIP:
Visit a Local Art Museum or Gallery: Ask each family member to remember his/her top three favourite pieces of art. Then have a great discussion afterwards as every family member talks about their favourites and what they liked about them.
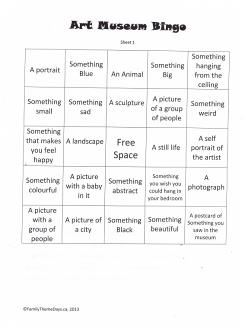
Art Museum Bingo: Print out a copy of my Art Museum Bingo. If you fear your child might not like a trip to an art museum give this a try. Each child is given his/her own Bingo sheet and can use his/her own judgment when deciding which paintings or art forms cover the various categories (each painting etc. can only be used for one square). This can start discussions of the art as you go through the museum. Ask your child why he/she picked a certain painting as being “sad” or why he/she choose the statue as something he/she would like in his/her bedroom.
Art Scavenger Hunt: You can go online and research big museums to see what pieces of art are available. When we went to Washington DC I wanted to visit many of the monuments and museums but I also wanted my 4 ½ year old to enjoy himself and of course behave. By going online and I cut and paste various pieces of art (and monuments) and made a worksheet for him to use as a scavenger hunt while we toured. Beside each picture was a box for him to “X” of when he saw the statue etc. It was a big hit and he still likes to look at the hunt glued in a scrapbook. |

|
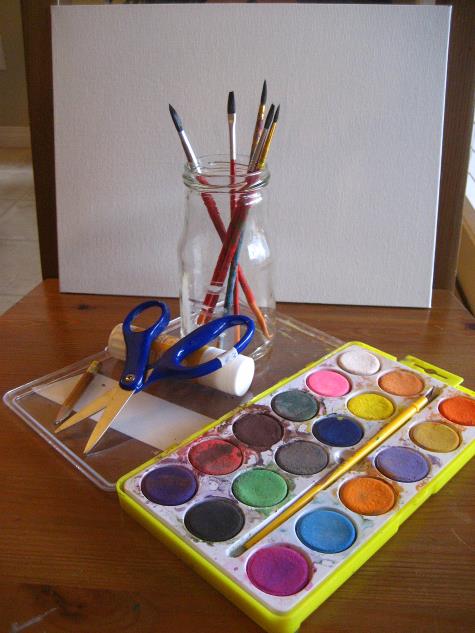
Time to be Creative! |
|
Photo: C Wright |
|
Art Supplies Colouring Page |
|
Journaling About Art |
|
Project 1: Perspective (Cityscape and Tunnel) |
|
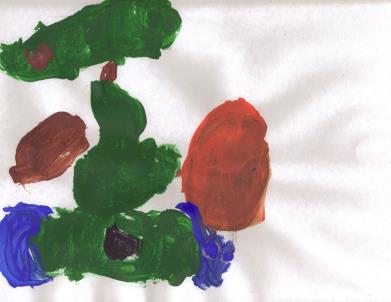
Project 2: Still Life Painting “Basket of Easter Eggs” and “Various Objects” |
|
Project 3: Styrofoam Print Making |
|
|


|
Project 4: Pastel Art—Monet Inspired Bridges |
|
|
|
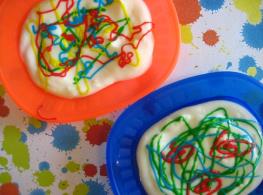
Project 5: Pointillism Picture Made with Markers |
|
|

|
|

|
Project 6: Portraits inspired by Matisse |
|
Project 7: Teddy Bear Cubism |
|
|
|
Project 8: Munch Style Chalk Expressionism |
|
|
|
Project 9: Pollock Inspired Abstract Art |
|
Project 10: Surrealist Masson Inspired Drawings |
|
Project 11: Cartoon Character Pop Art |
|
Project 12: Self Portrait in Chosen Medium |
|
Project 13: Clay Busts |
|
Project 14: Mobiles Inspired by Calder |
|
|
|
|
|
|
|
|
|
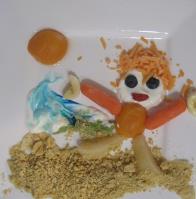
Food as Art |
|
Art Theme Day Printables |
|
|
|
|
|
|

|
Host Your Own Art Show! |
|
|